Three Biggest Considerations with Shooting Video
The three things that need the most consideration when shooting video are:
- Audio is more important than video
- Keep it stable; keep it smooth
- Light it up
Audio
Audio is even more important than the video images you shoot; and it's not just me saying that.
People seem to tolerate poor images much better than they tolerate poor sound. It's not entirely surprising in many cases: for example, music videos often have poor visuals, but the main feature is the music; or when watching a lecture or an interview, the visuals might just be one or two people talking, perhaps just "talking heads" - not visually riveting stuff. But if you can't hear what people are saying or singing because it is too soft or there is too much background noise, it is invariably annoying and distracting. At the other end of the spectrum, great sound design can really set up the atmosphere of a scene, for example, setting up suspense or giving the action on screen much more impact.
The most important thing about recording audio is to get the microphone you are using as close to the source of sound as possible. This is the number one tip for getting the best "signal to noise ratio" - a $20 microphone ten centimeters from a speaking person will generally sound better than a $1000 microphone trying to pick up the same speaker from 5 metres away.
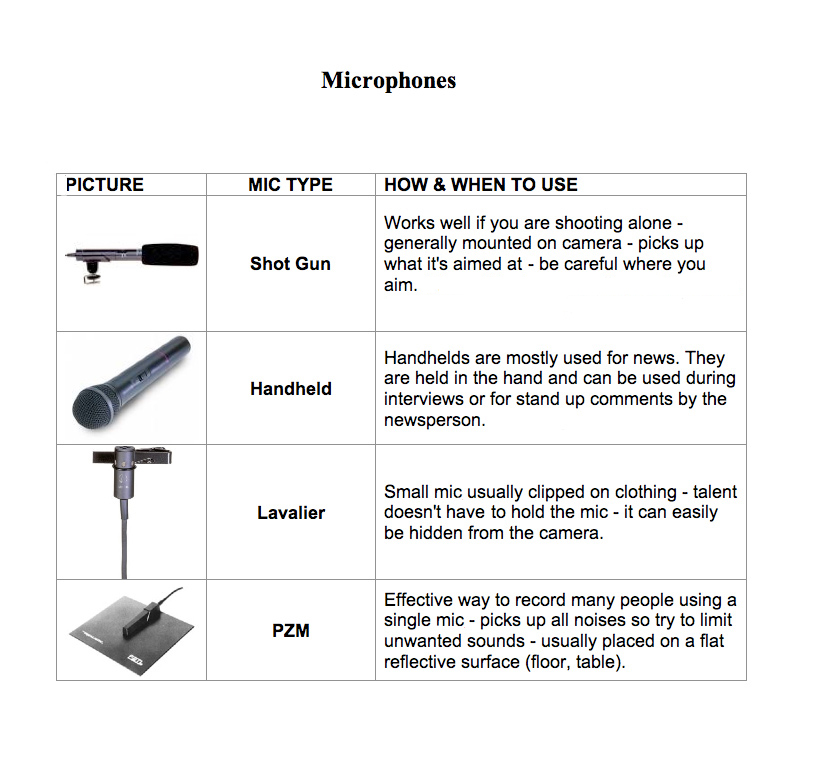
Generally, this will mean that some kind of external microphone is required. There's an engaging video on different microphones and how to use them here:
Apart from microphone placement, there are other technical considerations that you can read more about in this article on the importance of audio and how to get the best results.
If you are trying to record into a mobile phone or tablet with a combined headphone and microphone jack, you'll need a "splitter" or adapter cable to allow you to connect an microphone to your device. I recommend splitter cables made by KV Connection and own several myself for connecting various types of microphones to my own mobile devices.
Stable and Smooth
The number one mistake that most beginners, and even some experienced video makers make is not keeping their camera stable, or any movements smooth. While there are some situations that will call for camera movement of various kinds, the best place to start is to shoot with your camera on a tripod, shooting stable shots without any movement (including zoom). This JISC article on shooting videos for education asserts that the tripod is the next-most-important piece of equipment after the camera itself.
If you will only be using the tripod to hold the camera still, without any movements on the camera (known as "tilt" for up-and-down movements, or "pan" for side-to-side movements), you won't need a very heavyweight tripod - a basic photography tripod that is strong enough to securely hold the camera is sufficient. These are also often quite light and portable.
However, if you wish to move the camera on the tripod while recording, there are specialist video tripods available:
- These are considerably more heavy, so as to support heavier video and
film cameras, as well as for providing more stability while operating
the camera.
- Good video tripods will also have a "fluid head". This is a special head whose moving parts contain a mineral oil that smooths and dampens camera movements.
- The best video tripods have head that can be re-positioned without adjusting the legs, to allow the camera to be easily "leveled". This is sometimes called a "leveling bowl" or simply "bowl".

Even if you have a video tripod, avoid the temptation to do lots of camera movements, or to zoom lots. Those are also hallmarks of amateur video. Any movements should be part of the narrative, or contribute to the message of the video in some way.
Lighting
It is said in professional circles that photography is the art of lighting, and as with any profession or art, lighting takes many long years to learn well - far longer than can be explored here.
Let's just look at three basic aspects of lighting:
- How strong is the light? (intensity)
- How hard is the light? (quality)
- Where is the light? (location and direction)
Light intensity is simply how strong the source is. The sun is very intense, and very bright; much more intense or bright than, say, an incandescent bulb.
Light quality is how spread out the light source is. If a light is coming from a small source, or a far-away source, like the sun on a cloudless day, it will tend to throw hard, high-contrast edges on everything it touches. If a light comes from a large surface - for example, a cloudy sky, or through a closed non-blockout blind, the light will seem spread out and "soft" or "diffused". This is regardless of the intensity of the light - it's possible to have a diffuse but strong light; or a dim but hard light. Here is an entertaining video that looks at light quality in more detail: https://vimeo.com/57890592
The location and direction of light are to do with where the light is coming from, and, if it has a shade or other means of directing it, where it is going to. If the subject of your video has light coming from behind them, then the shadow falling on their face may make them seem very dark.
Here is an image showing the same subject with poor, and good, lighting:

Here is a great video on sources of light - starting with whatever lights are around you, and going through lots of options including el cheapo (but highly effective) hardware store "work lights": http://www.youtube.com/watch?v=DZY_ILcwoj4. If you are a bit creative, you can also use readily-available, free or cheap materials all around you: everything from white bedsheets to diffuse light coming through windows, to large pieces of white cardboard, plastic, or foam to reflect light where you need it.
Once you're familiar with sources of light, here is a video with some clear advice and practical lightup setups for video https://vimeo.com/33672808
Basically, the ideal lighting for most video situations is bright and diffuse, and illuminates the subject from a location that makes the light look natural. This is usually going to be above the eyeline of your subject - most natural light sources, such as the sun, illuminate us from above; but not too high: lights coming from directly above will tend to make shadows in hollow areas of the face, such as above and below the eyes.
Activity
After you watch the videos on audio production, do a bit of research on the web. What do you think would be a good first microphone for the kind of video you would like to make, and why? Note that this answer may differ between people, depending on your different needs. Provide your answer in the "Comments" section below.